

Cotton Ball Stamped Snowman Painting for Kids
Although it has felt like a hint of spring the last few days, I know that we aren’t quite done with winter yet here in Michigan. In fact, I think it is supposed to snow in just a few days. If you don’t get snow or are all done with snow for the year, please know that I am very jealous and will gladly take all of the details of the warm weather so I can live vicariously through you and your sun soaking ways. Sometimes Ryan and I strongly consider moving, but Michigan does have great summers and fall is beautiful here. For now, we are staying put, I guess.
Before I fully transition into spring content, I wanted to give you one last winter idea for the kids. This was a great way to spend a chilly afternoon and created some artwork that I’m saving to hang up and display next winter. Below I’ll share my new process for storing art and give the step by step instructions on how to create your own snowman with your child! I hope your kids enjoy this as much as mine did!
Most of the materials for this activity are probably already in your house somewhere, but honestly the googly eyes make it so fun! I gifted a set to one of the kids as a stocking stuffer, Easter basket, or Love Box item at some point and they were a hit. This activity is a great way to wrap up winter and say goodbye to the snow. Plus, you can pull out this artwork every year and let your heart melt at perfectly imperfect snowmen.
Here’s What You Need:
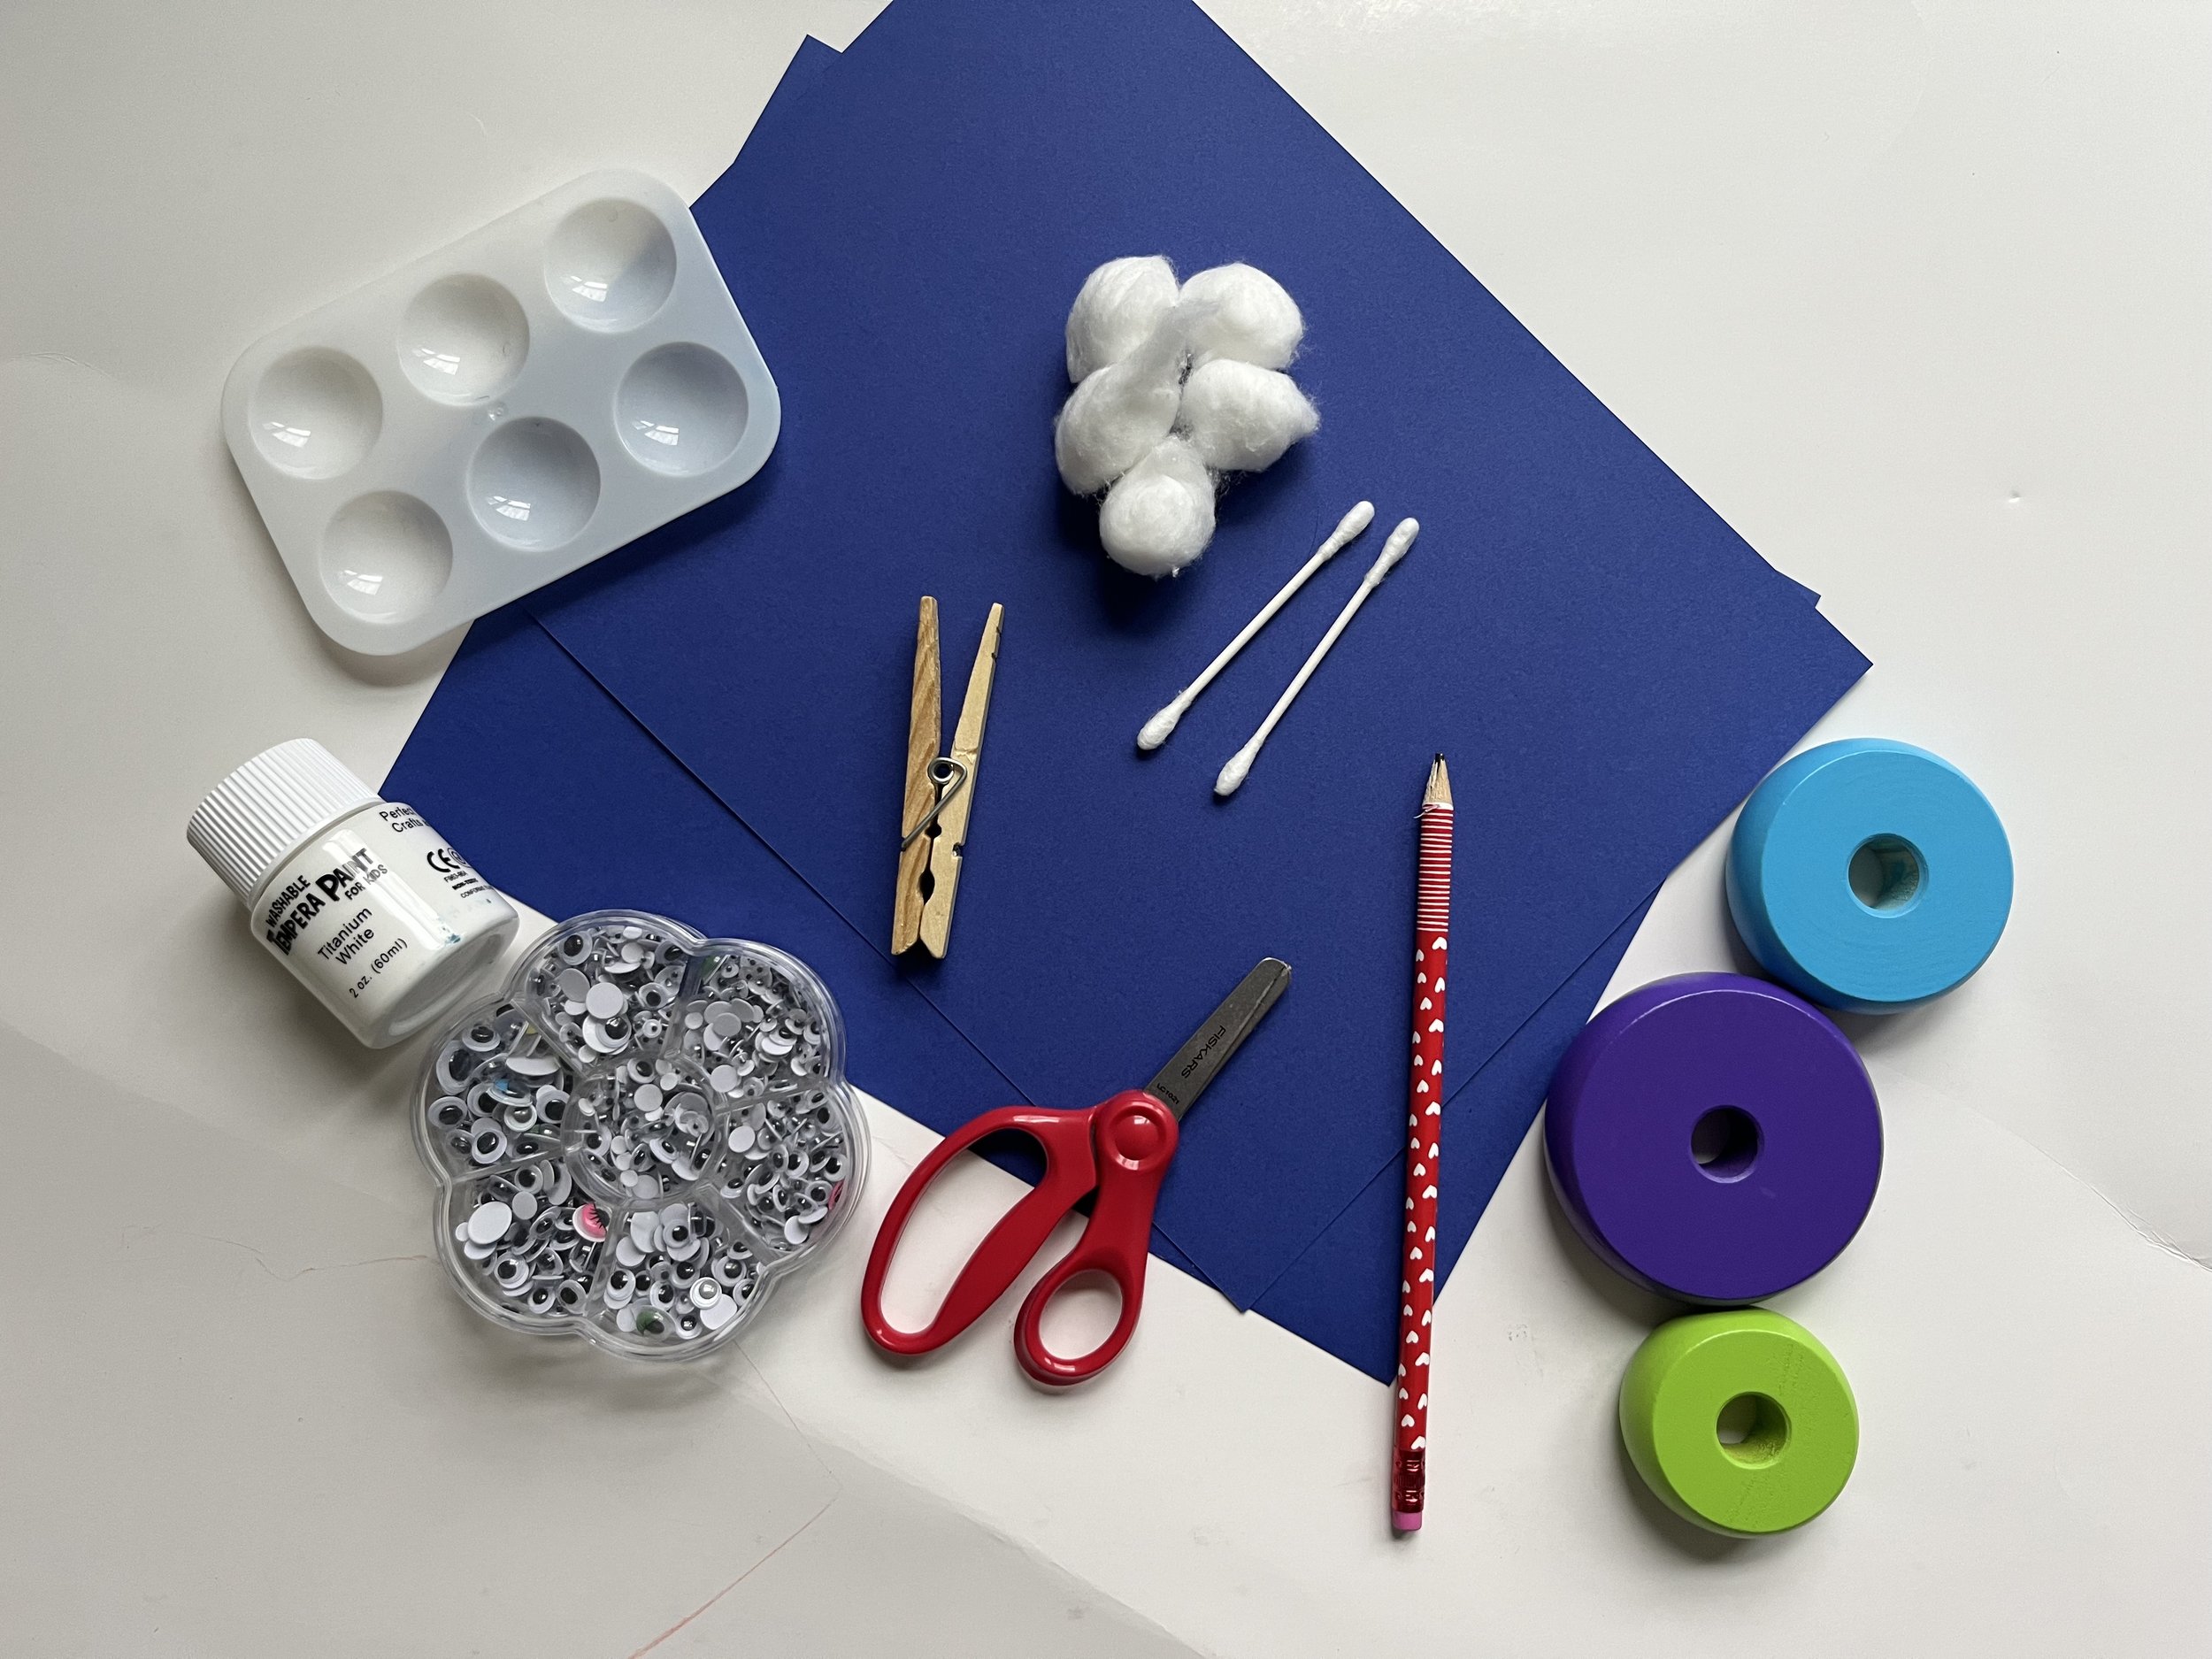
Construction paper- we used blue as our background.
Paint. Washable all the way here! We also used this brand for the colors, but only because my kids like the bottles better for some reason. I actually prefer the paint I linked first for most projects.
Some type of round toys, bowls, cups, etc. One of our stacking toys was perfect and gave us great concentric circles to make the snowman shape.
Painter’s tape- technically optional, but very helpful, especially for little ones.
Cotton balls
Cotton swabs
Pen/pencil
Glue if your googly eyes are not self-adhesive.
Set up
5-10 minutes
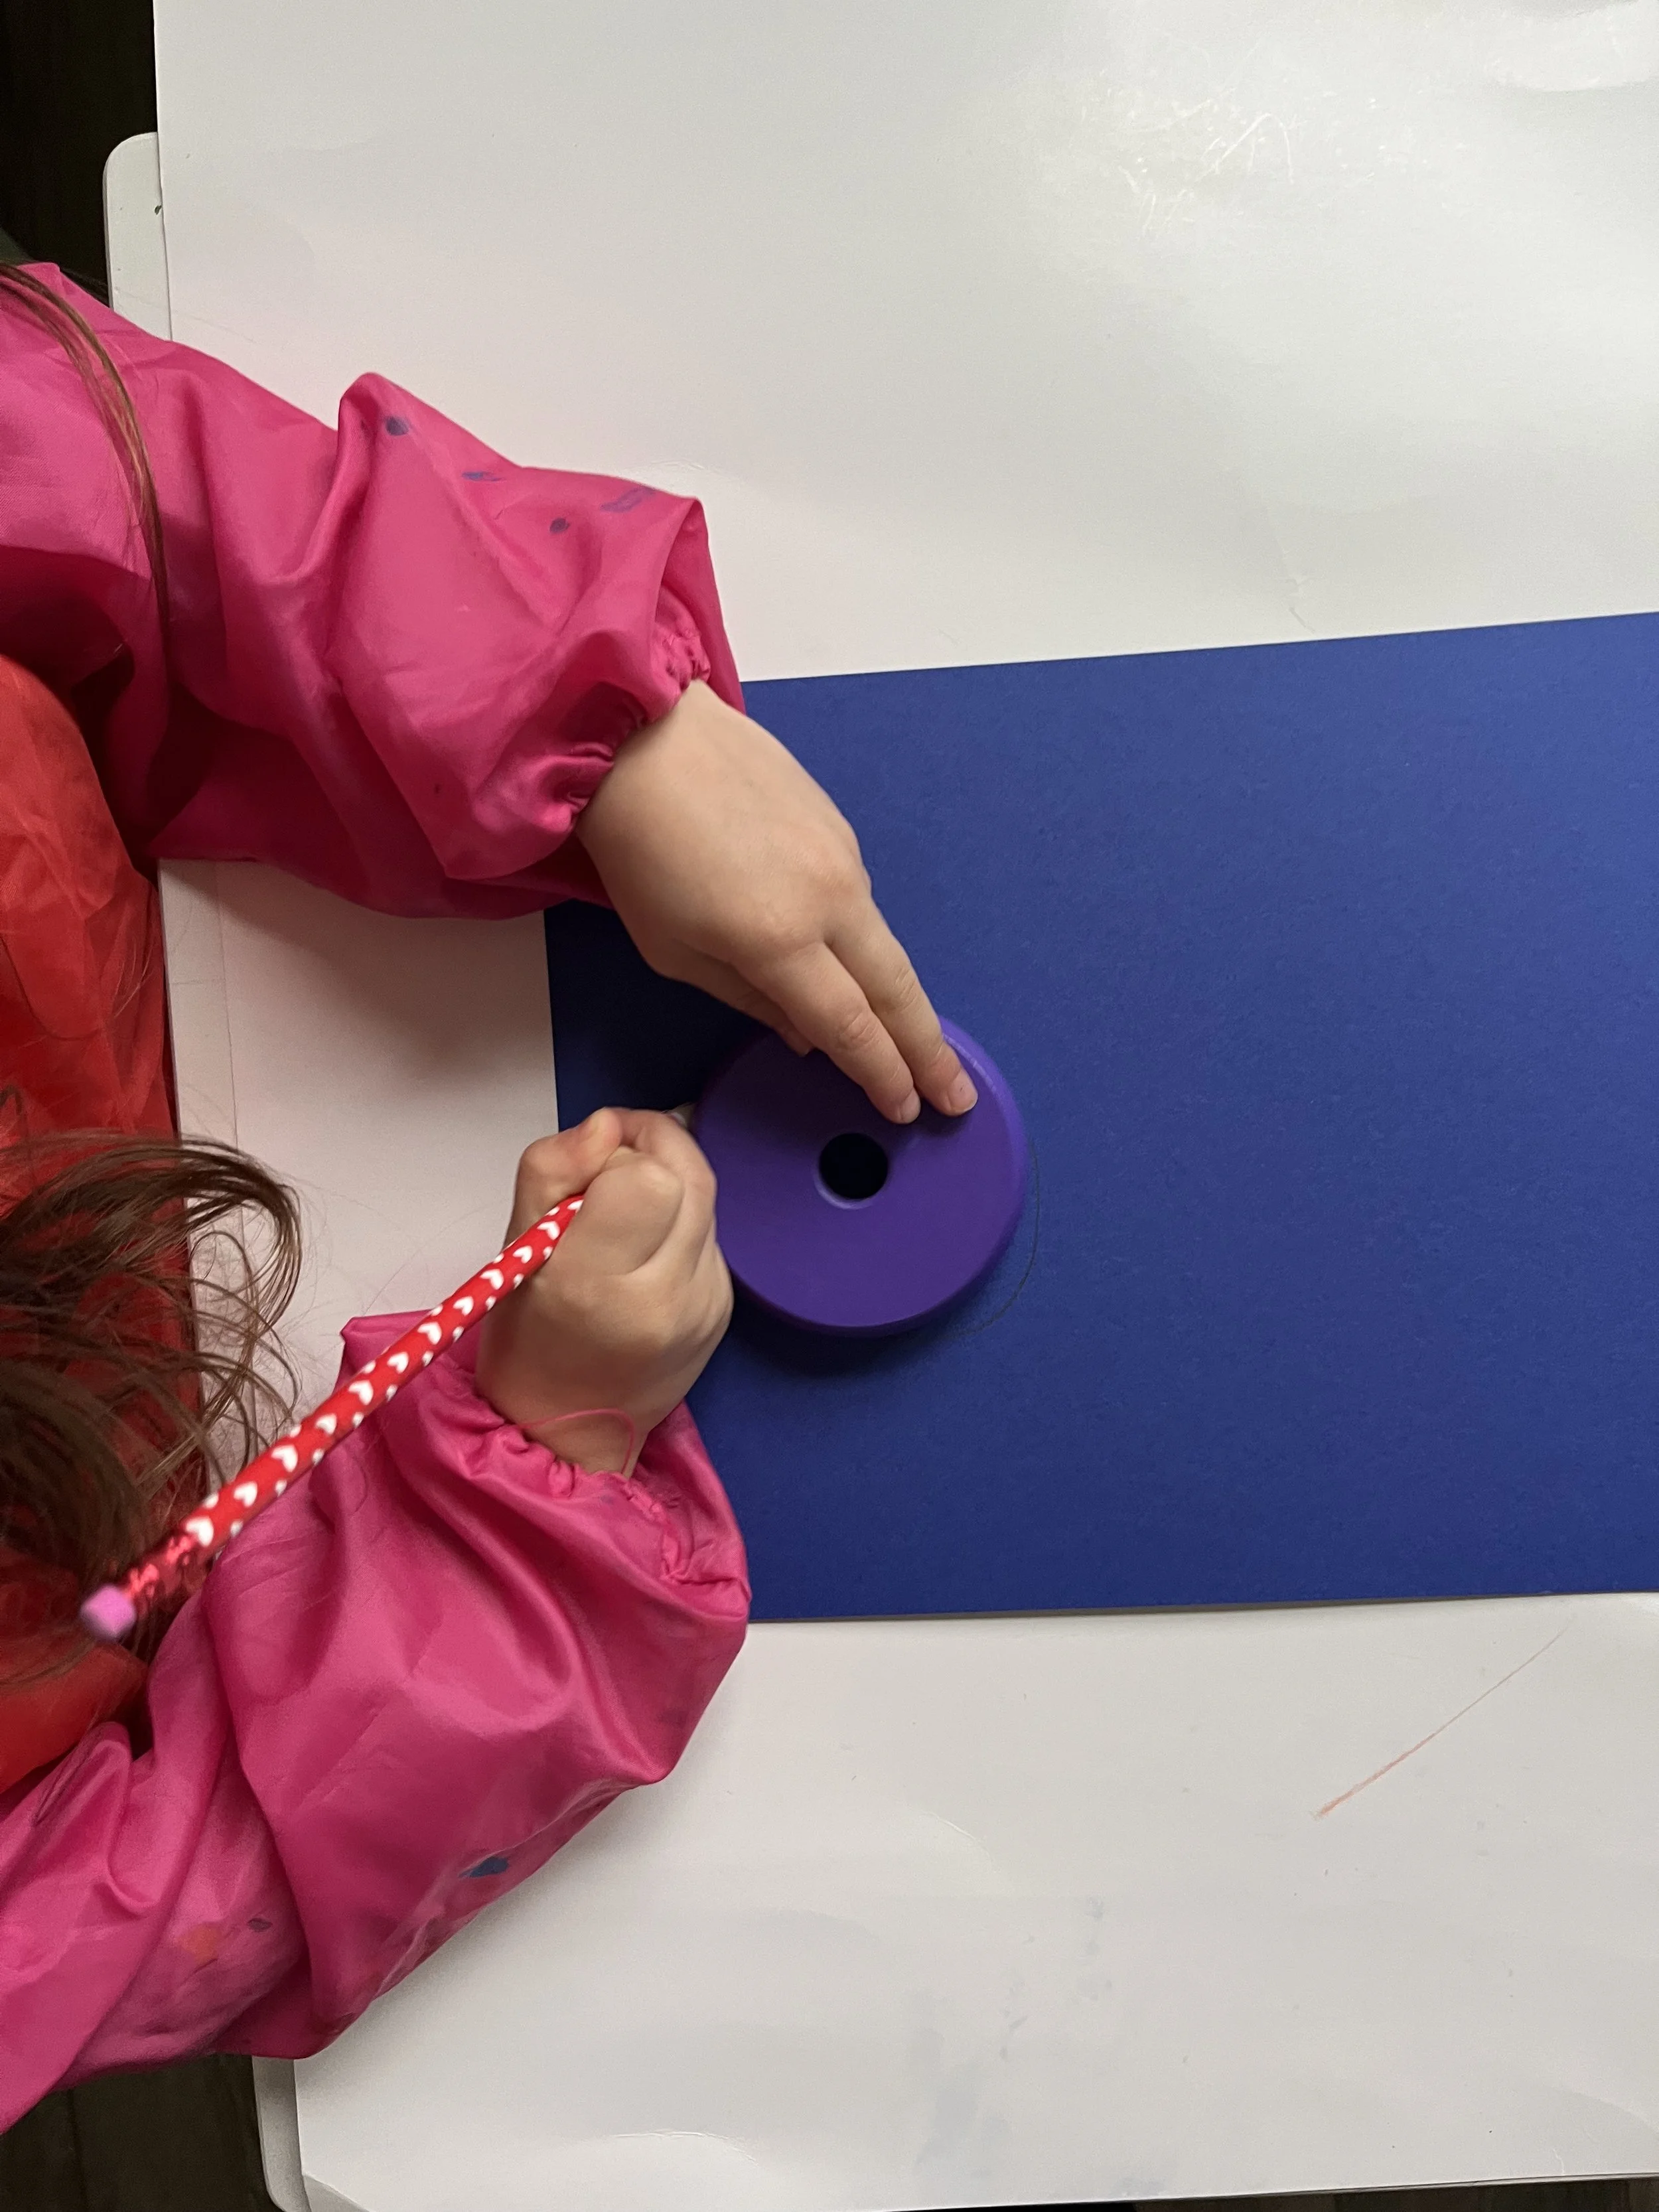
Trace circles onto one sheet of construction paper. This will be your template and you want it to be sturdy. The circles will overlap and they do not have to look perfect. I let Vaila trace this and it only barely resembled a circle, but I was able to rescue it with scissors come cutting time.
Cut out your template. I gently folded the paper right in the middle of one of the circles and used my scissors to cut a slit. Then I uncreased the paper and started cutting the outline from the inside out, leaving the outside of the paper intact. I did this step so the template would actually work, but older kids might be able to help here.
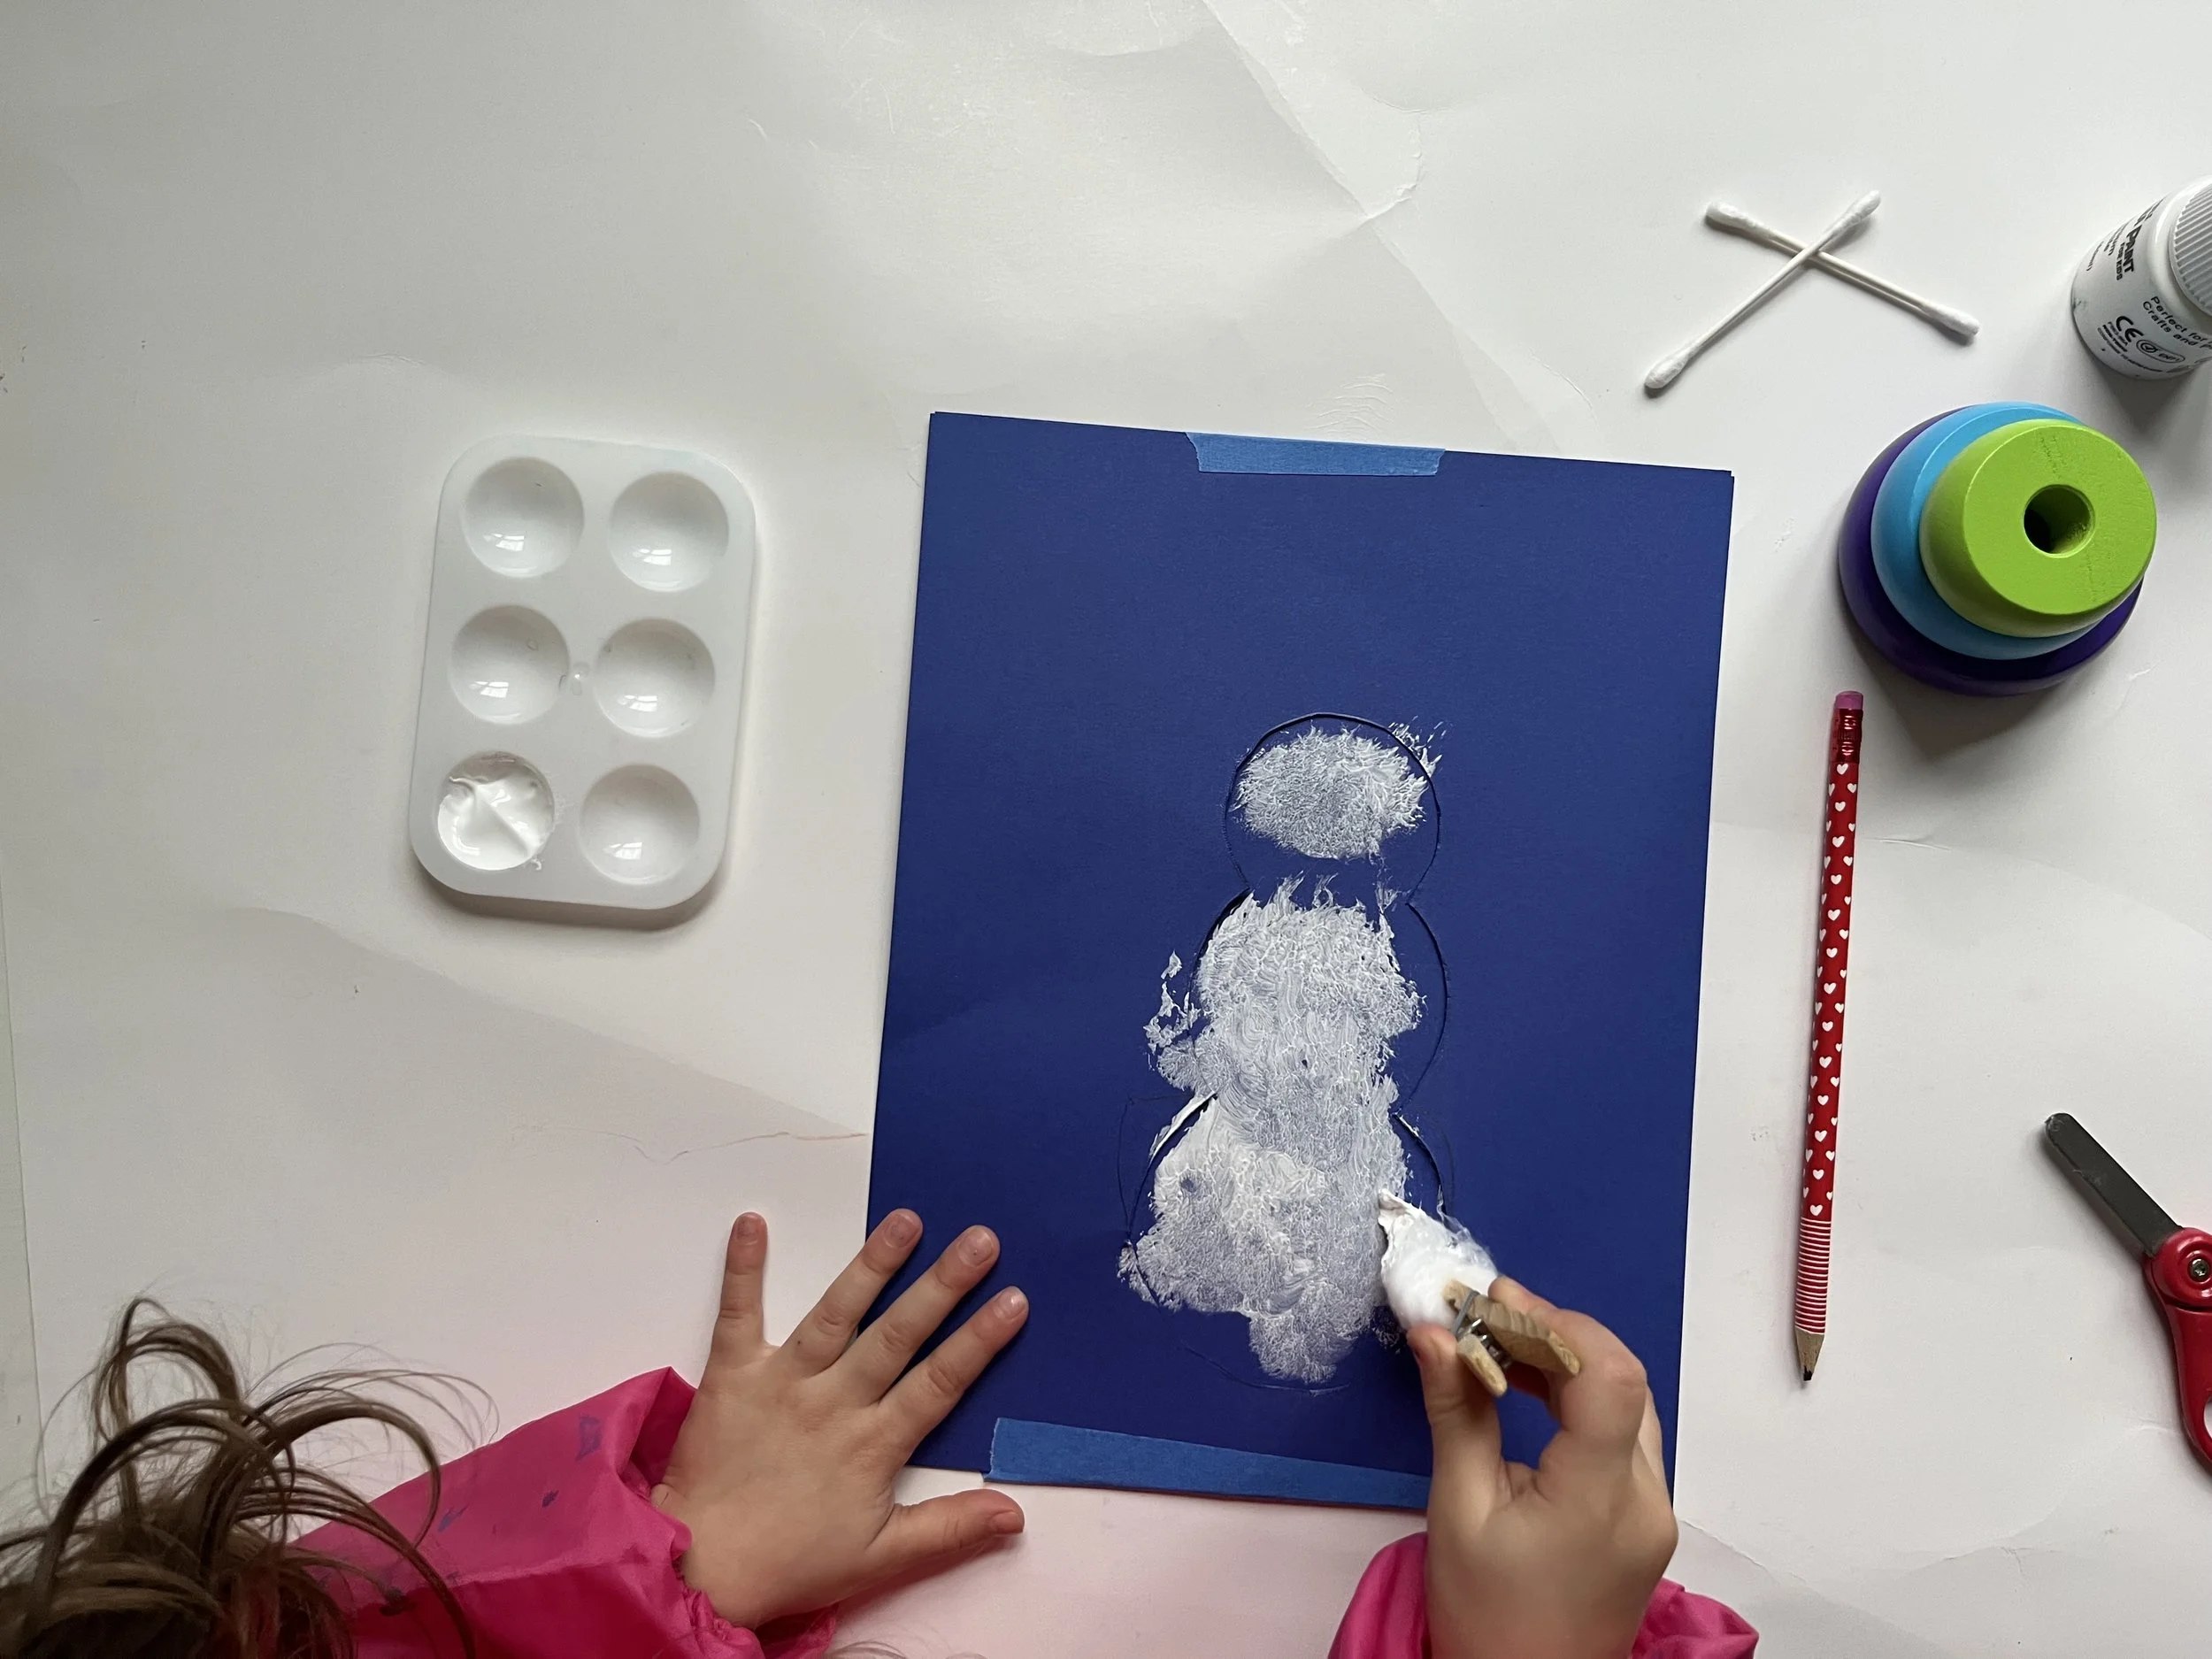
Tape the template on top of the background paper. This helps keep the papers in place and gives you/your child a nice clean finished product that will actually resemble a snowman.
Fill up your paint palette with white paint (we didn’t add the other colors yet to avoid accidental red snowmen bodies).
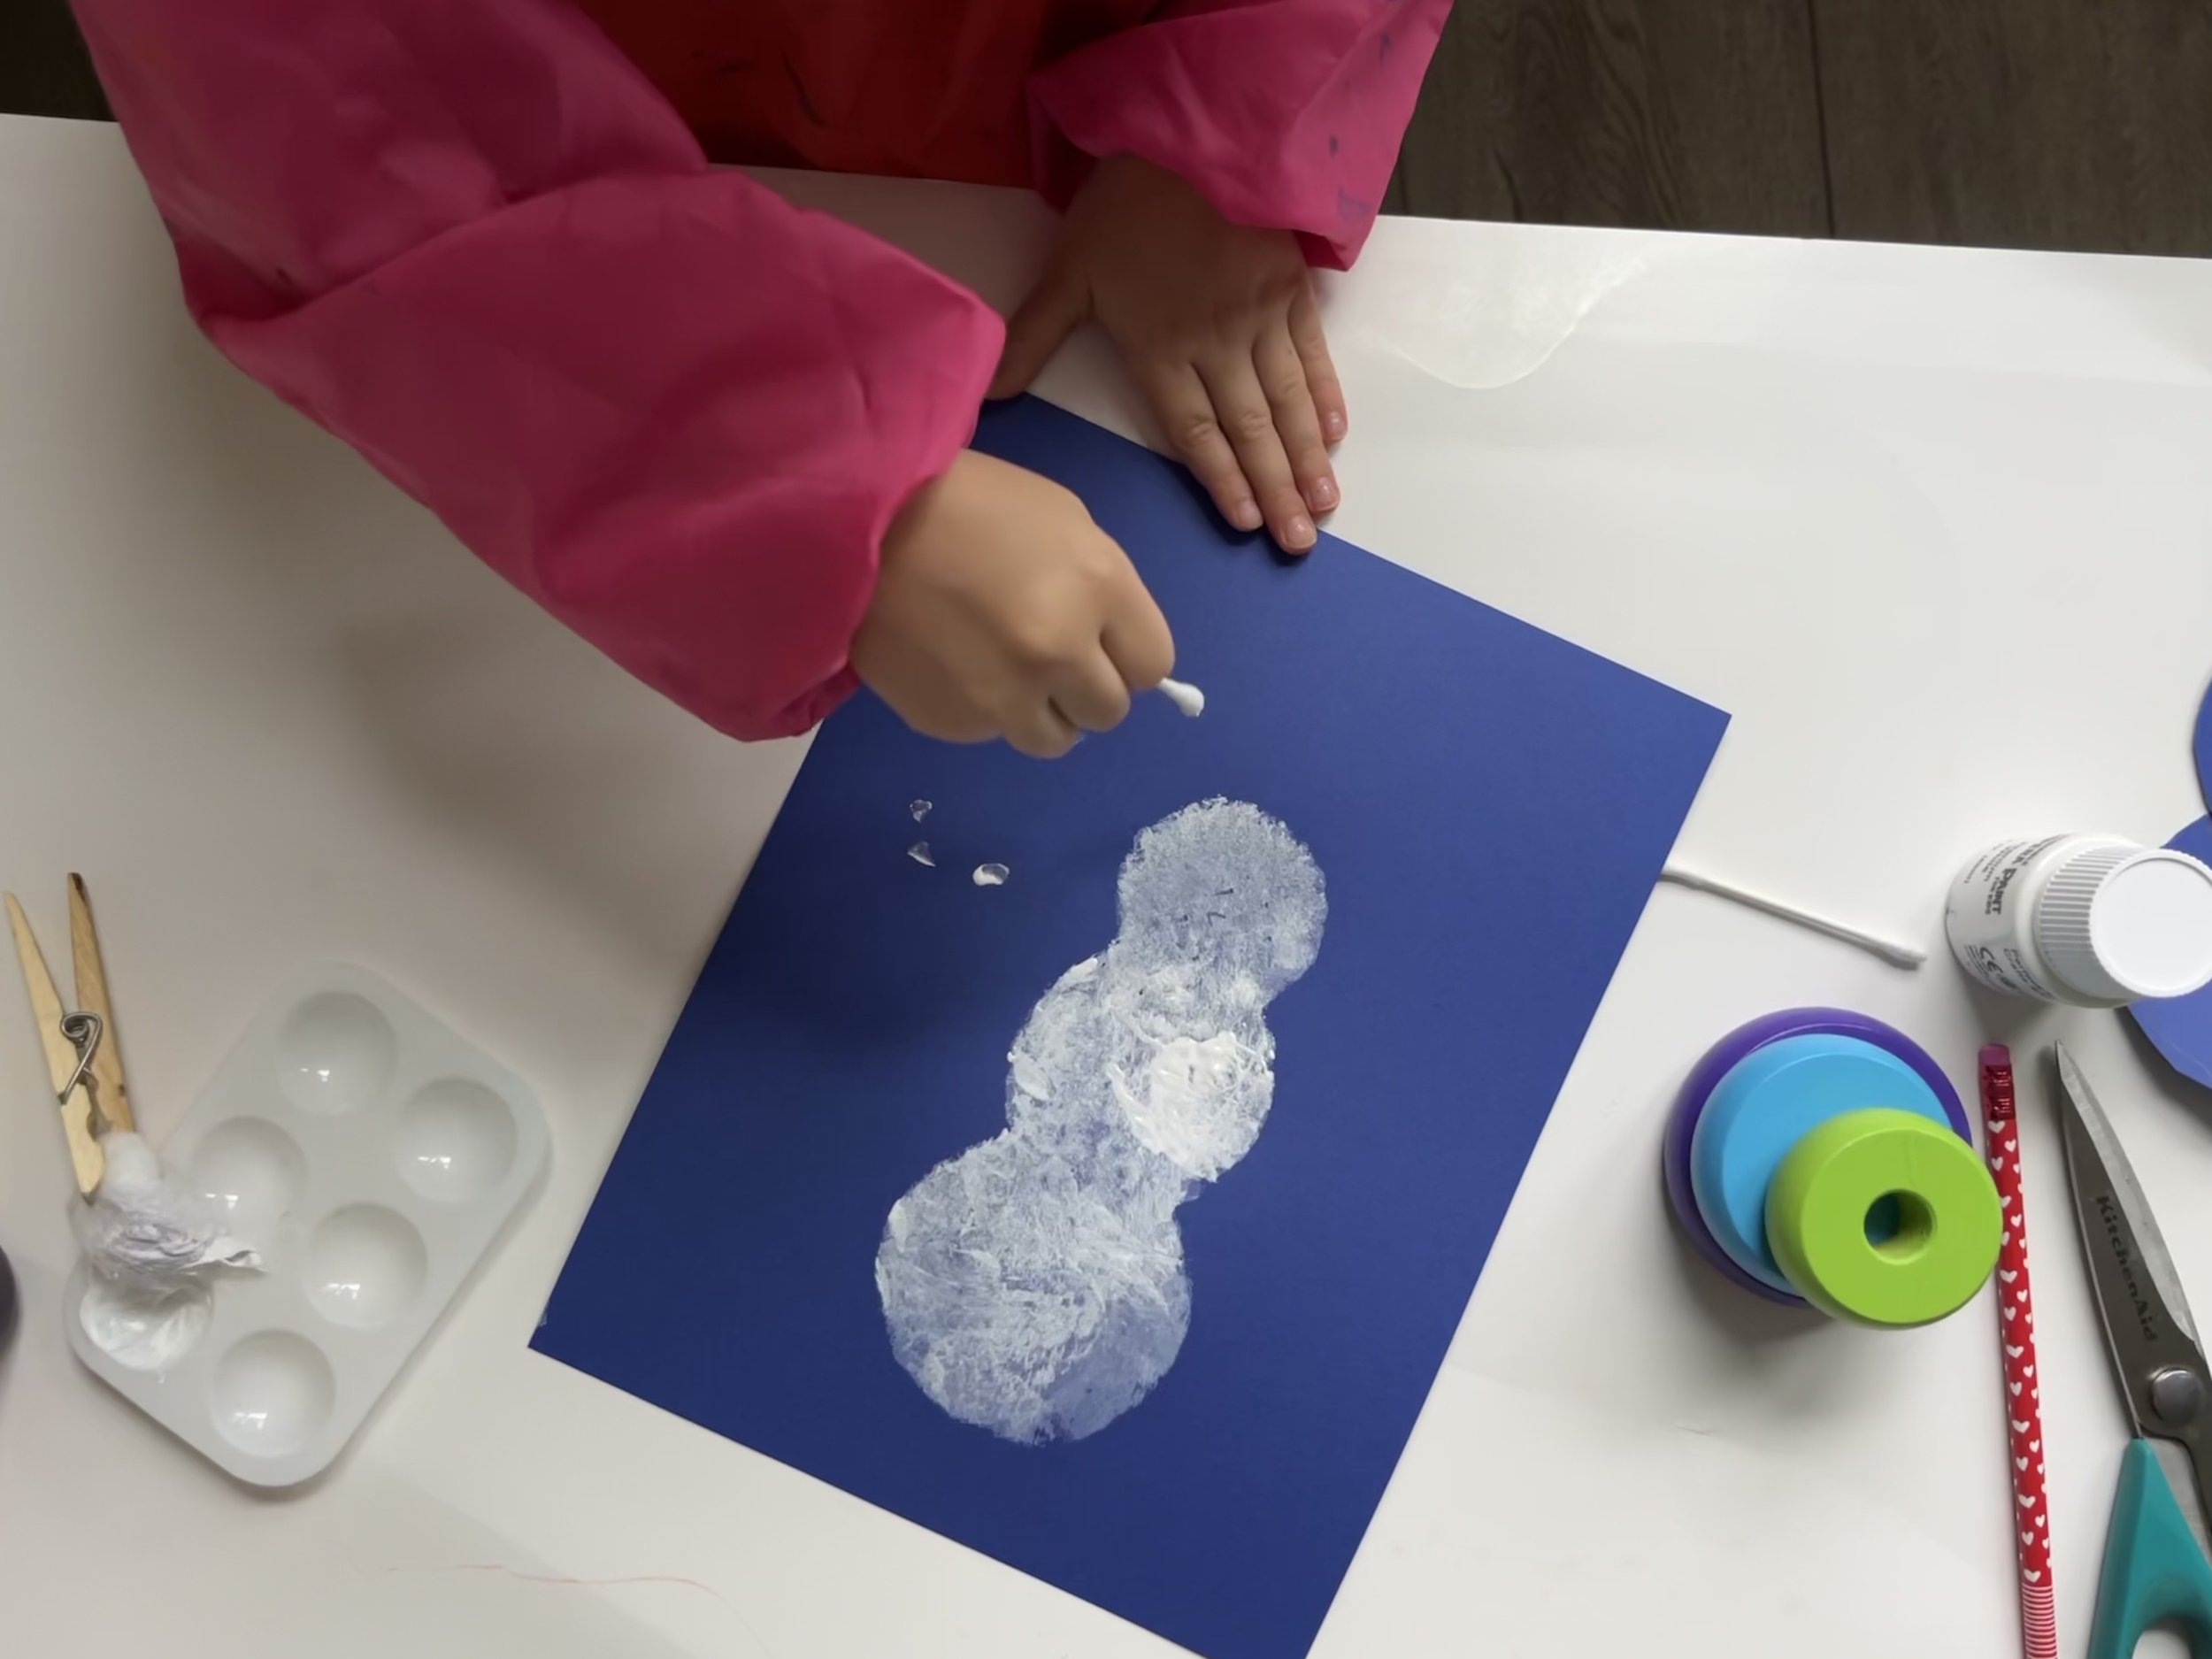
Use a clothespin and cotton ball as your painting tool. We dabbed/stamped/dotted inside the template to create the snowman body.
After the whole snowman is complete, remove the template and let the background page dry. Vaila was too impatient and started working on the eyes, arms, and snowflakes right away. She had some smudged paint, but it turned out just fine.
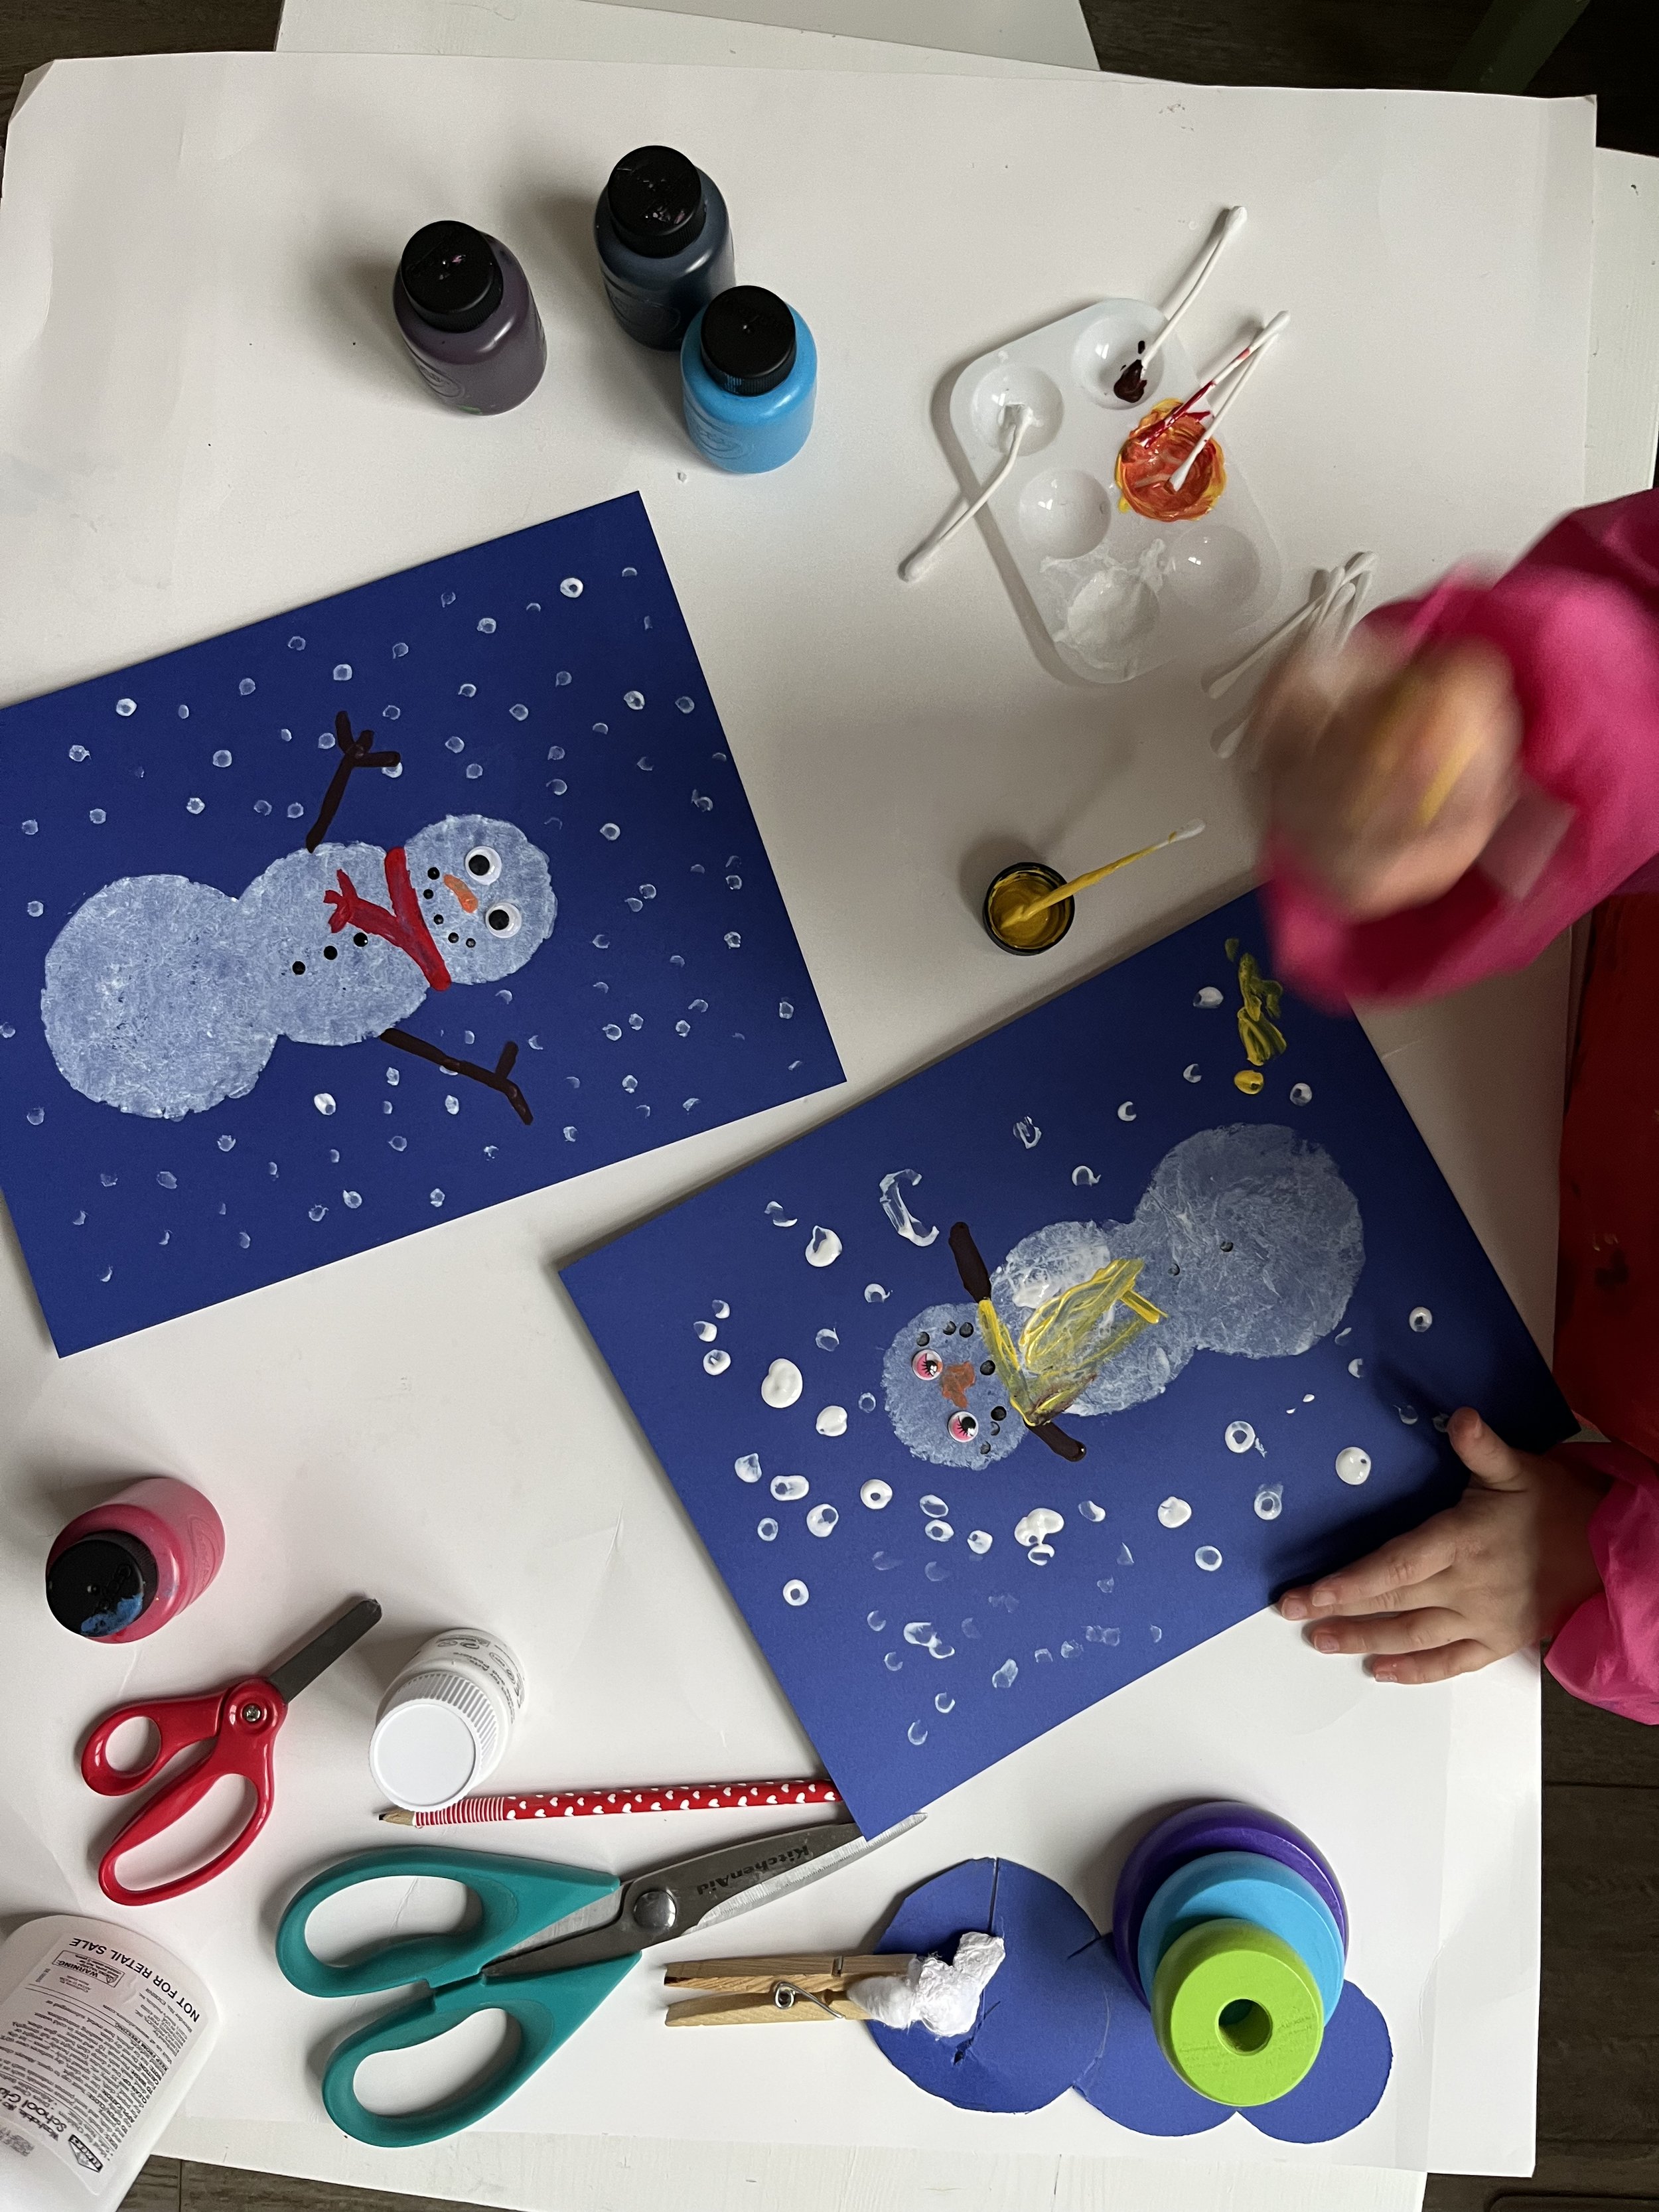
Add in snowflakes using white paint and a cotton swab. Again, we dotted/dabbed/stamped to create the snowy sky.
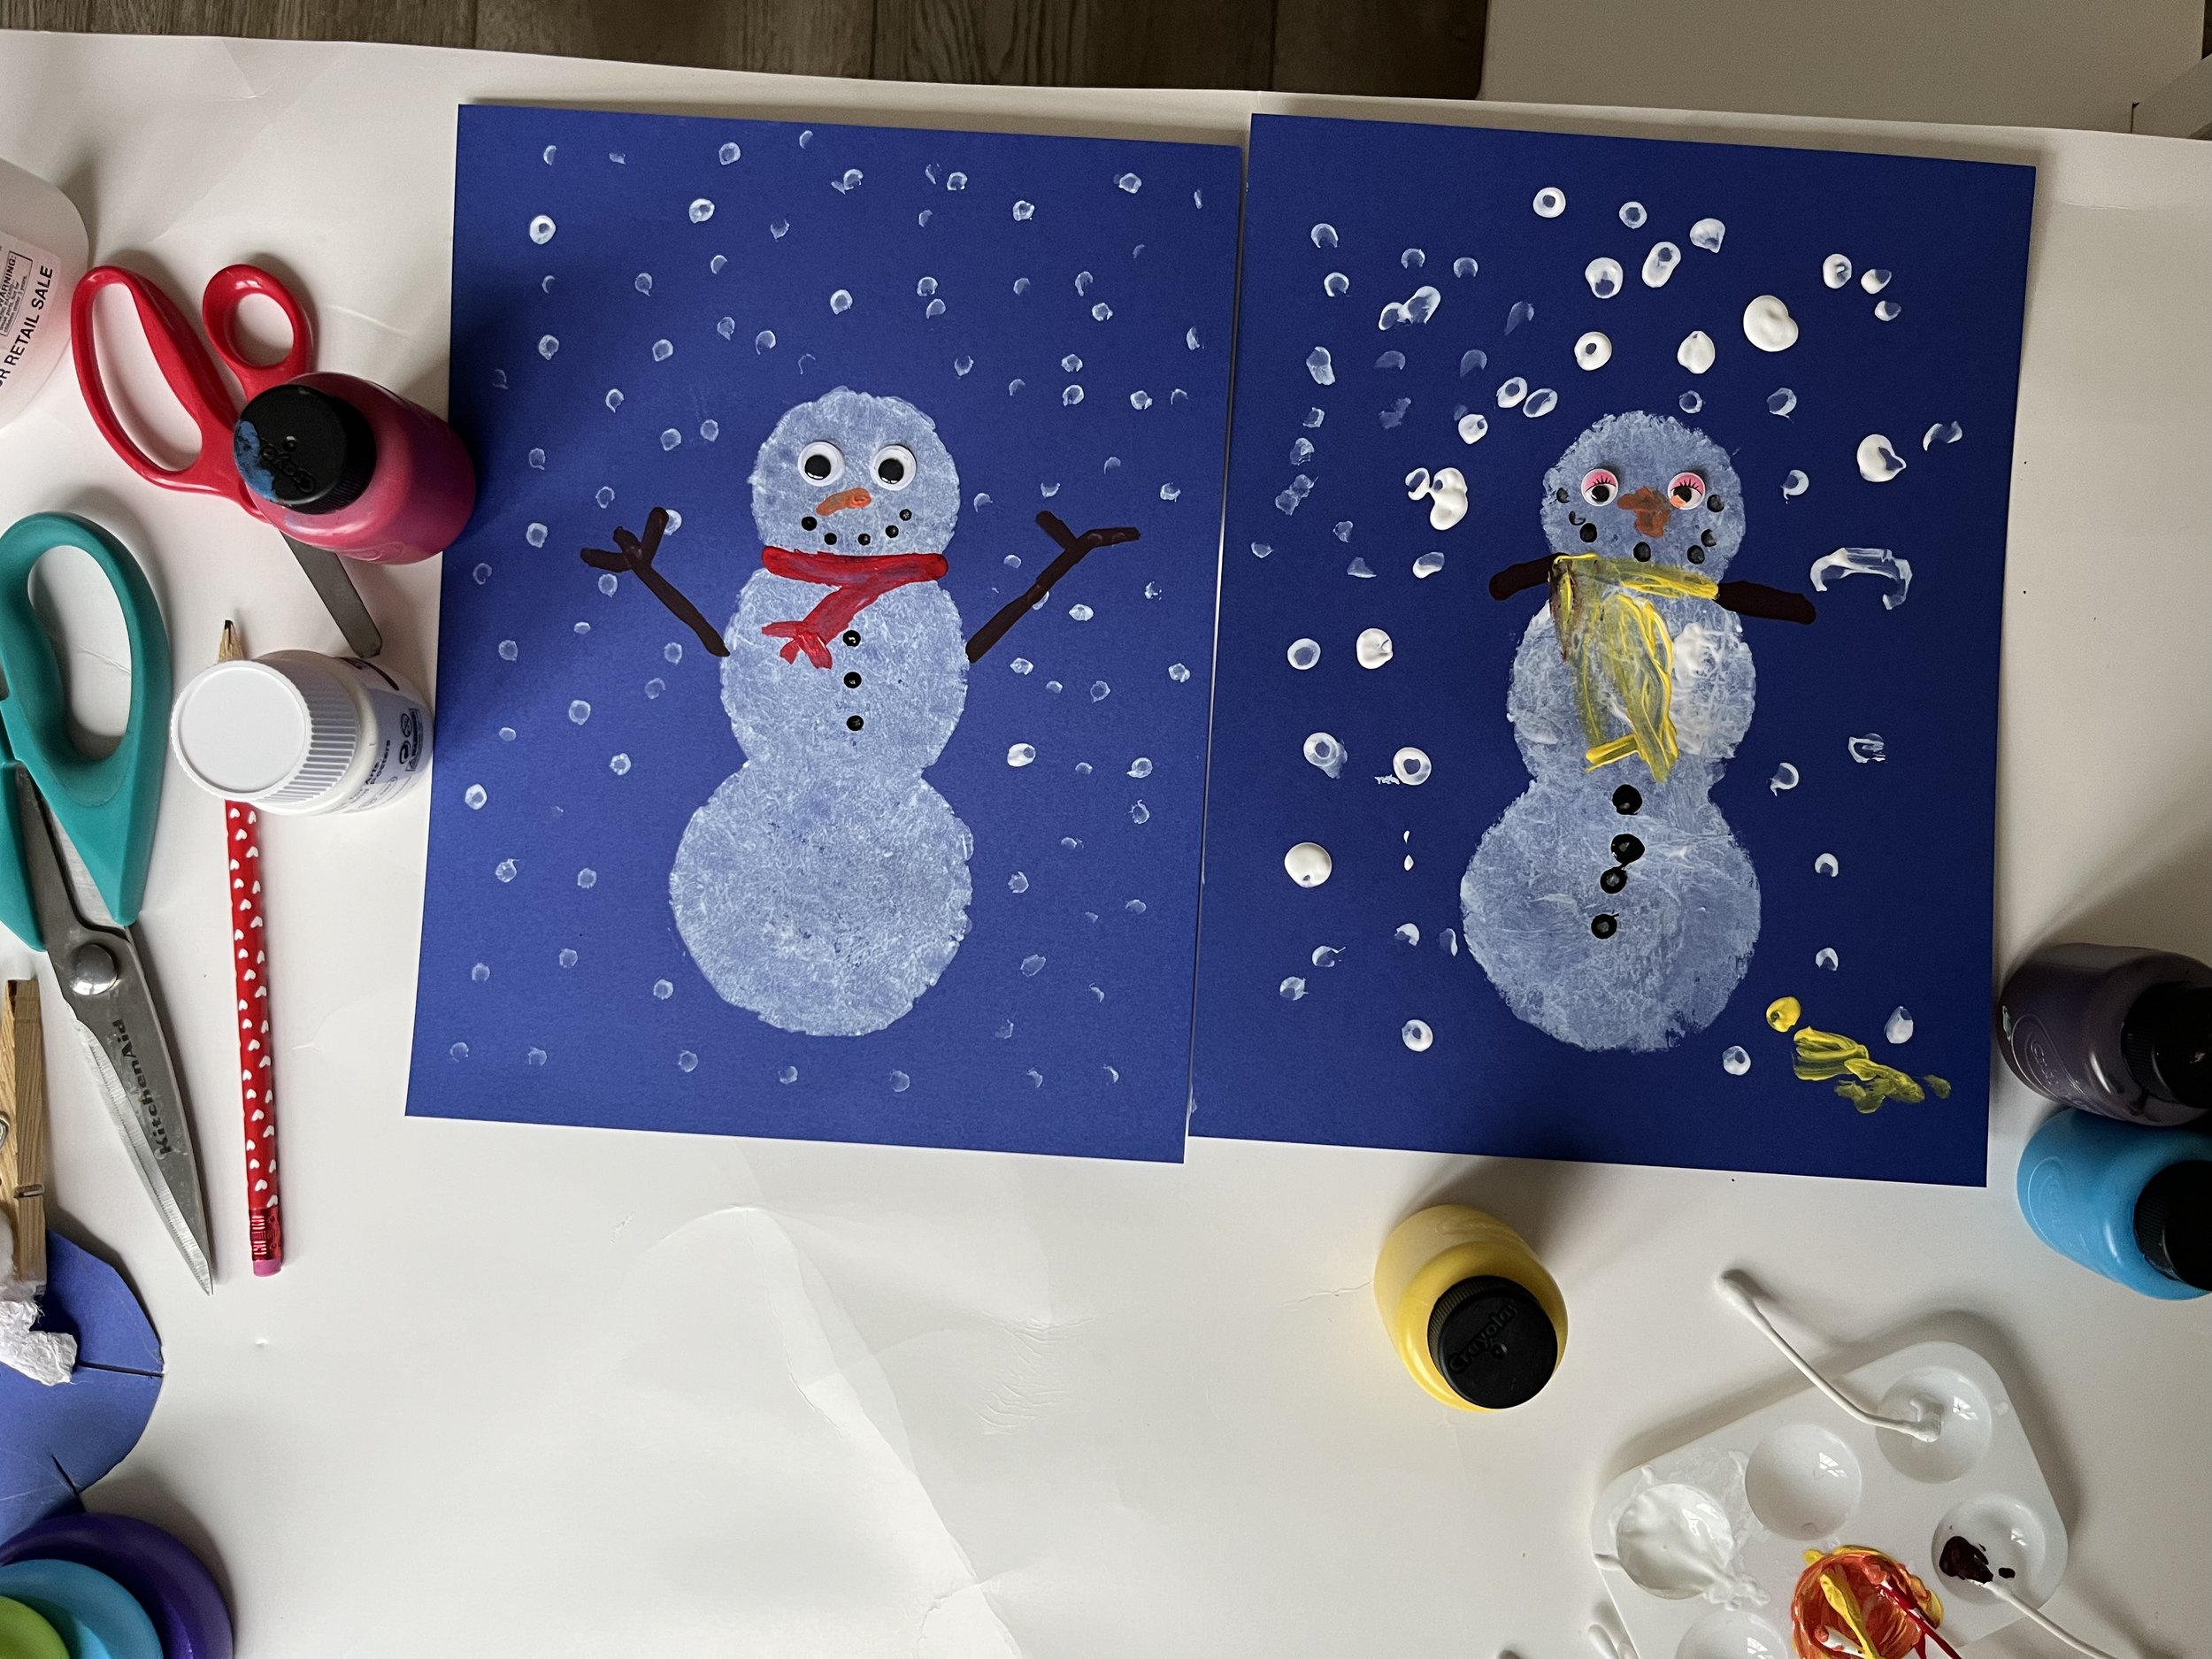
Let everything dry and add the googgly eyes to make this snowman extra fun!
Use another cotton swab to paint on the scarf, buttons, mouth, and arms.
Let the whole masterpiece dry and enjoy your child’s winter wonderland picture for years to come! Be sure to add the year or your child’s age on the back.
Clean Up
1-3 minutes
Throw away the template, cotton swabs, cotton balls, and tape.
Rinse off the paint palette and let the clothespin dry. I save my paint covered clothespins for other crafts or activities.
Rinse the smock as needed.


Ok, I know that seems like a lot of steps, but I promise it didn’t take too long to set-up or do. The longest part was waiting for the paint to dry, but as I mentioned, Vaila did not want to wait. Her snowman turned out just great, so don’t sweat it if you also have an impatient preschooler at home.
Hopefully you can see in the photos above and below that my 3 circles are different sizes. You can use any circles available to you or draw them freehand. I was planning to display these, so I didn’t trust my circle drawing skills to be wall worthy. Remember, when you are making your template, the inside portion will be thrown out and the outside part will be used. It didn’t matter to me if the inside looked funky or wasn’t perfect. I wanted to preserve the integrity of the outside.


Once you have your template cut out, place it on top of your background paper. I used 2 blue papers, but your template can be any color you want. The bottom piece will be the background for your child’s artwork, so pick a color accordingly. I used painter’s tape to keep the template in place. It was easy to remove and we could reuse the template multiple times.
I asked Vaila to help me with most of the steps. Even if she didn’t complete the step independently, I encouraged her to participate for a few reasons. First, it isn’t much fun for a kid, or adult, to sit back and watch someone do something you wish you could be doing. Second, I think it really fills her attention bucket when we work on projects together. Finally, I really want her to feel comfortable and confident in trying something unfamiliar, knowing that she probably won’t be perfect, and practice asking questions or requesting help.
While crafts are cute and I like spending time together, ultimately, I find a lot of life skills are built into our activities. My kids are in a phase of simply stating a need instead of asking a question. So, we practice exact wording of how to ask for help or get more information to do things independently. Working side by side or being near my children when they are practicing something new also allows us to improve their frustration tolerance. Tracing is still sometimes tough for Vaila, and she would have been completely fine if I swooped in to “fix” her first attempt at a circle. Instead, I asked some questions about her plan and said that I was available if she needed help or wanted my opinion. We worked on that first circle together and then I requested her help with the next two.


Next, we paint. I almost always leave the kids in charge of pouring the paint. This specific type is generally slow moving, making it perfect for kids just learning how to pour. It’s great fine motor practice and impulse control.
We used a closthepin with a cotton ball as our painting tool for this activity. You could skip the clothespin if you don’t have one available, but they do provide a unique way for kids to paint, helps work on hand strength, assists with pencil grasp, plus many other benefits.
Before the paint went on the cotton ball, I demonstrated how we would “dot dot” instead of wiping or swirling. You can really add paint in whatever form or fashion you or your child chooses, but we went with dotting to help keep our edges crisp.


After your child has filled up the entire snowman shape with white paint, remove the template and let the snowman dry. This was the hardest part in my house, so either have a snack/meal planned, transition to another activity, pause for a bathroom break, or fill time some another way. I was not prepared in any of those ways, so we went straight into painting the falling snowflakes.
If your child needs some extra guidance on where to put the snowflakes, you could use the inside of the template that you cut earlier to gently place on top of your painted snowman. We skipped this part because I didn’t want to smudge Vaila’s hard work more than she already was and because I felt like she could manage without the visual cue.
We used cotton swabs dipped in our white paint to make the snowflakes. Again, I demonstrated the “dot dot” technique and mentioned to only put a tiny bit on the cotton swab at first. Then Vaila could decide if she wanted to add more on or not. Some snowflakes might be larger than the others, but that is perfectly fine.

Finally, the time has come to add the googly eyes! Although our googly eyes are self-adhesive, I couldn’t get the backing off with my very short nails, so we used glue. I love watching the progression of eye and arm placement in kid’s artwork! It cracks me up and is cool to witness them orient a face and create the spatial awareness. Just me? I think Vaila adding the eyes first before the mouth was helpful for her to know where to put the other things on the snowman. You can do this step last if you want.
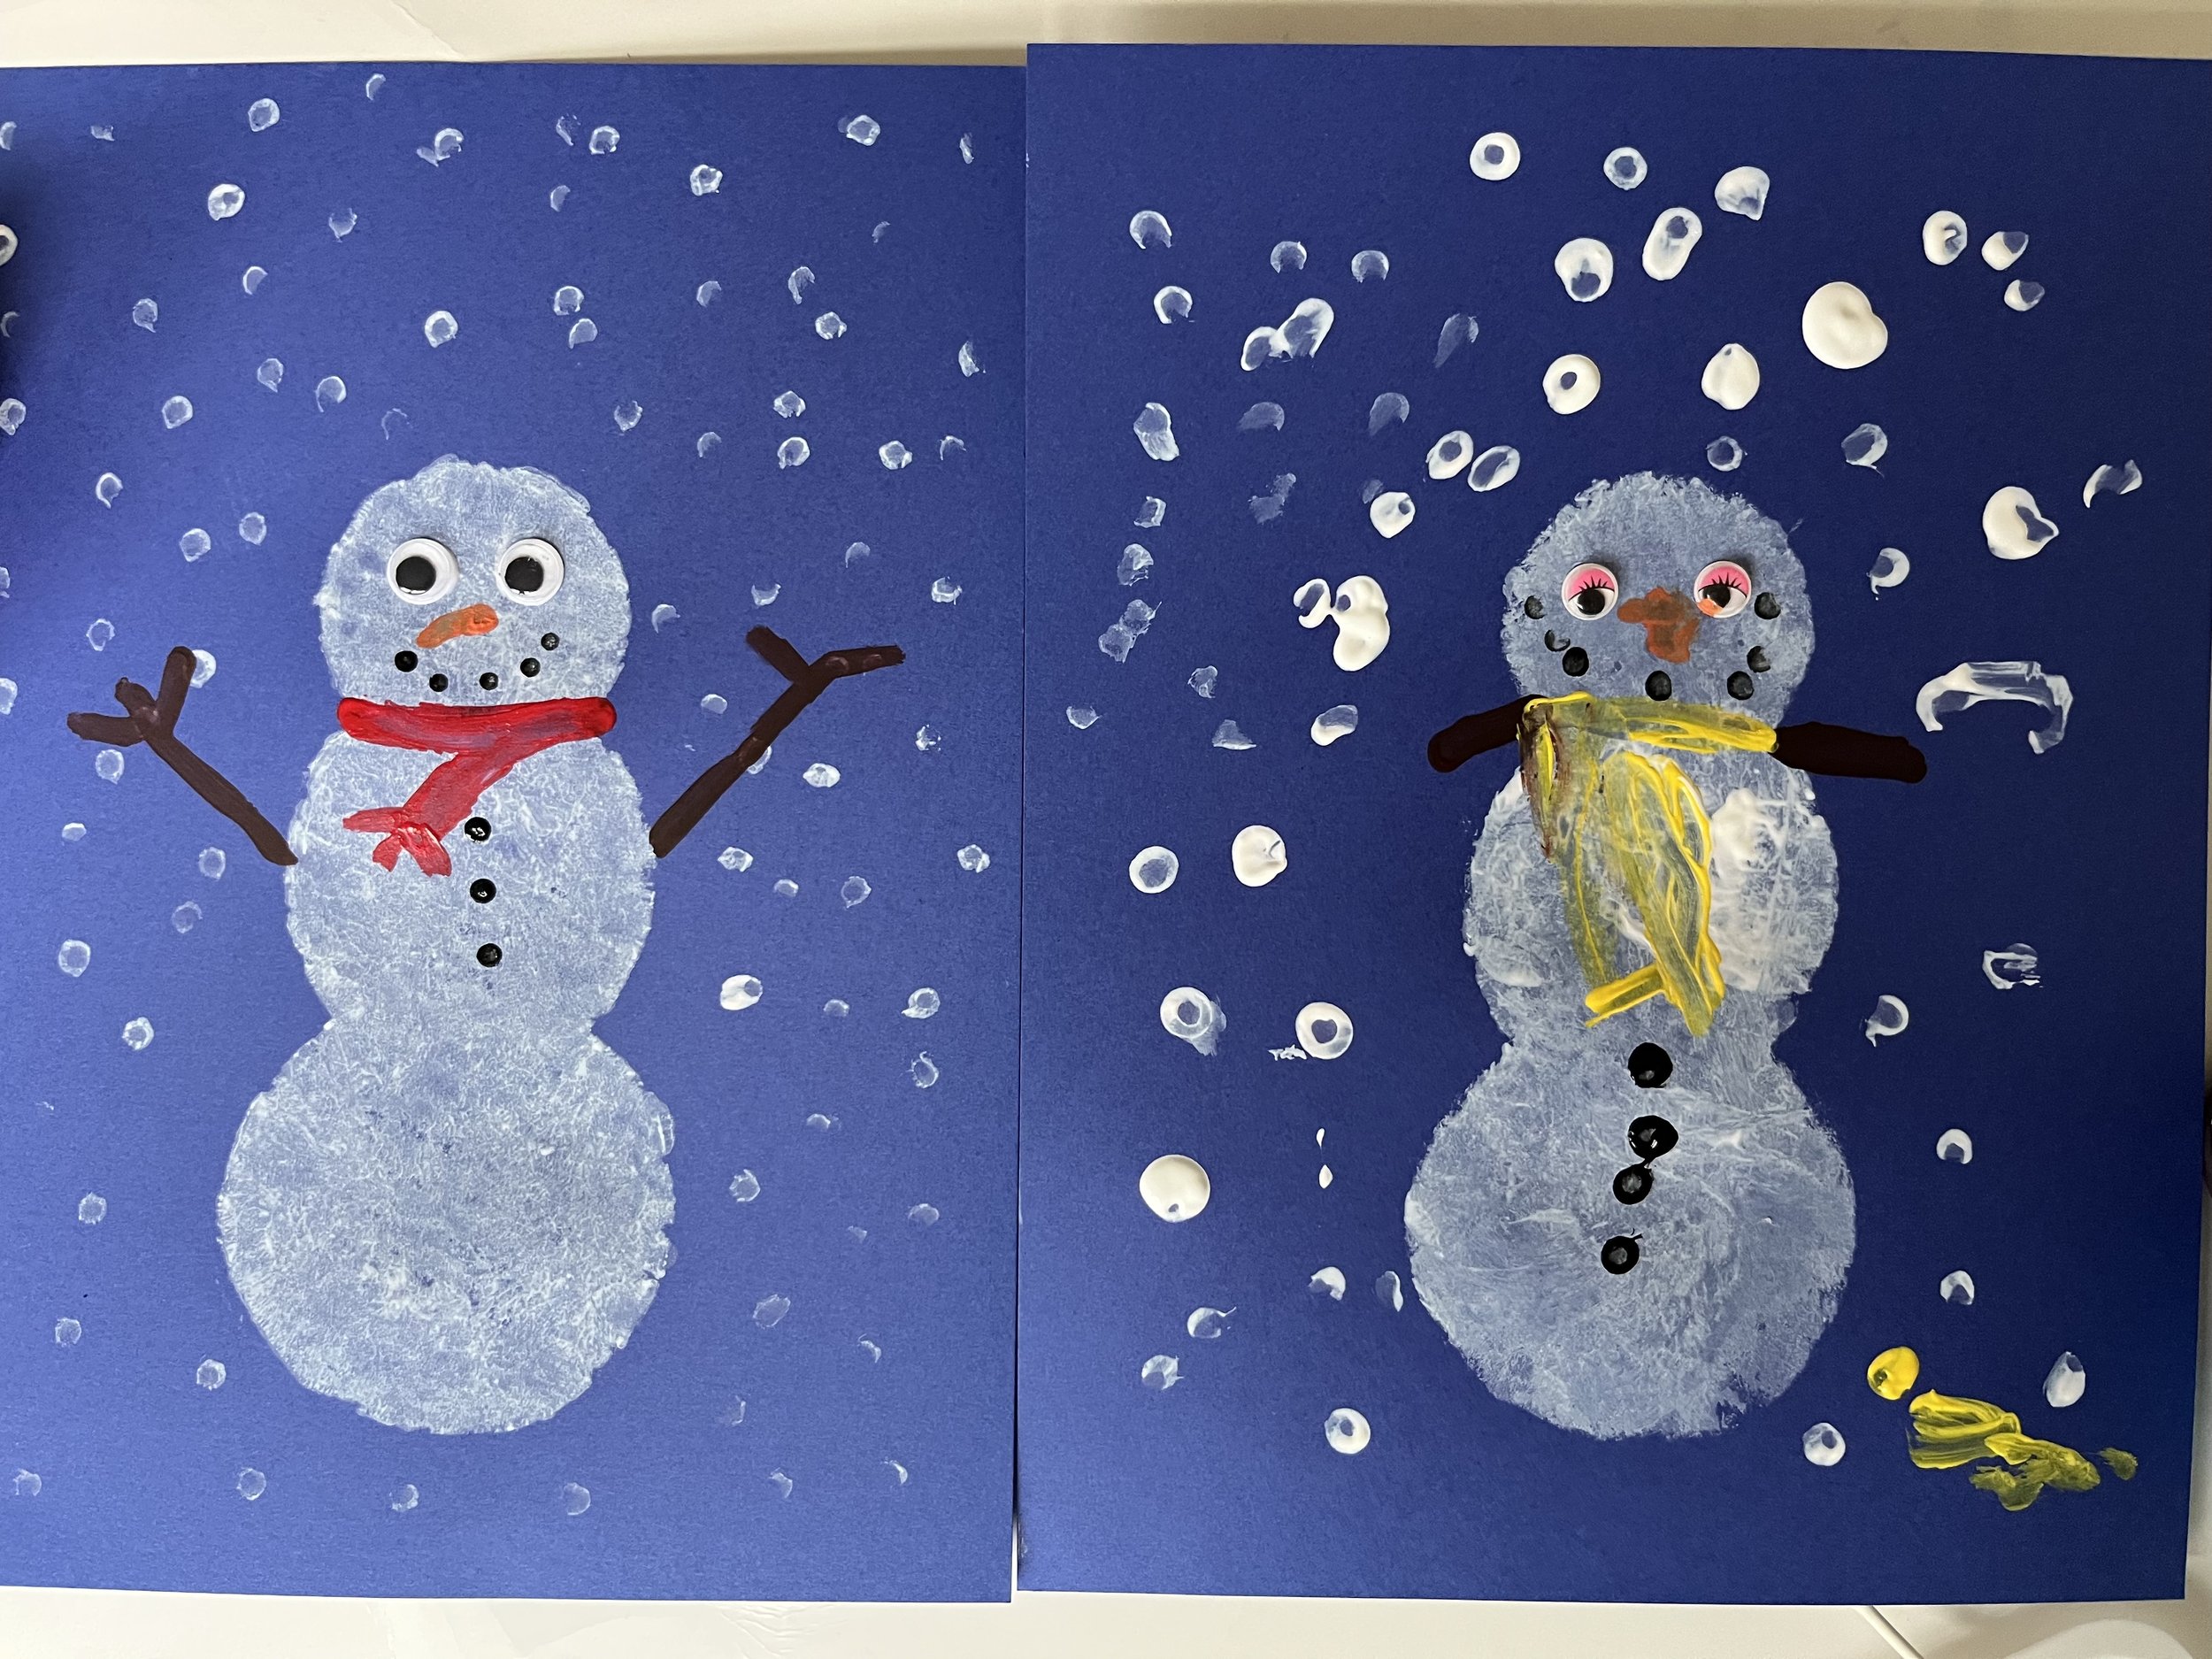
After the eyes are attached to the paper, we poured the rest of our paint colors. We chose black for the arms, mouth, and buttons, red and yellow for the scarves, orange for the nose, and can you guess what the yellow is at the bottom of Vaila’s picture? If you have a 3-, 4-, or 5-year-old in your house I bet you can guess correctly.


That’s right, she felt strongly compelled to make sure there was pee in her picture. You know, the one I plan to display for all of the winters to come. Oh brother, she is fully 3 right now! At least I will laugh every single time I see this picture.
Check out the finished products below! I think they turned out so cute. And no, I do not plan to hang up my own version of this snowman painting. I wanted you to have a non pee-stained version to look at, I guess!
I know that felt like a lot of steps, but I promise you this is a very doable activity. Disclaimer, I set this up while Ellette was sleeping because she likes to eat, touch, and smear paint still. I find I can better give my attention to Vaila without an energetic toddler running around and I anticipated her needing my attention for this activity. You can decide what will work best for your family.
Last thing- I promise. I wanted to share how I plan to store these for future display purposes. I ordered these art portfolio bags. They have several sizes in this set, so I can organize by child or season. This will keep all of the extra special artwork dry and flat, but out of our seasonal bins, so I don’t have to search and nothing will get crumpled. I plan to place a nail or Command Strip in our basement storage area to hang the bags on. I’ll update you one I have them in place, but that is my new art storage organization plan. We are inundated with children’s art at the moment, and I needed a better system to preserve the keepers. I’m hoping these bags are the answer to my artwork woes.
Please drop a comment if you have questions on this process. We actually made these snowmen over a month ago and Brinley has been wanting to create her own version. I saved the template and we have plenty of googly eyes, so it’s on our agenda soon.
Now go make this snowman and then we can collectively think warm weather thoughts starting next week!

Looking for other activities? Check these out:
You may also like…


I’m bringing you a whole post full of ideas that I am actually gifting this year! You are sure to find some inspiration in this post.